Installing and Configuring OpenVPN Server on CentOS using Webmin (part 3)
OpenVPN Configuration
Here are the steps to configure OpenVPN using Webmin:
1. Create Certification Authority
To create the Certification Authority, go to Server -> OpenVPN + CA, click on Certification Authority List.

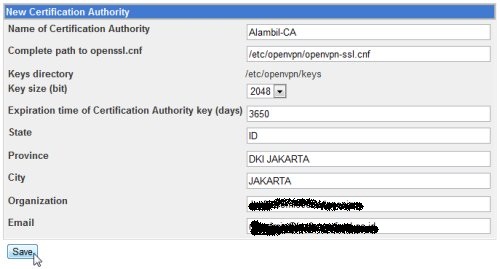
In the New Certification Authority form page, fill in the fields with the required informations and click Save.
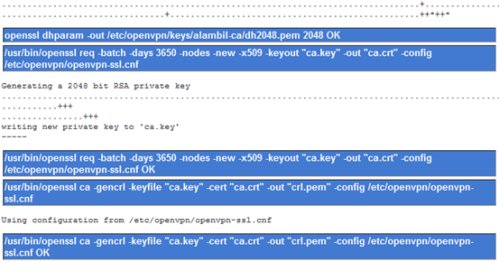
The system will generate required parameters, ca.key and ca.crt for the Certification Authority.

When finished, the Certificate Authority name will be displayed in the Certification Authority List.
2. Create Key for server
To create the Server key, go to Server -> OpenVPN + CA, click on the Certication Authority List, then click on Keys list.

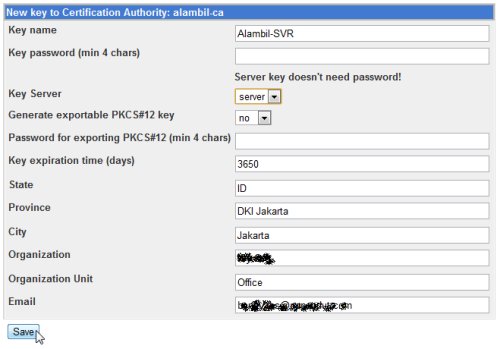
In the New key to Certification Authority: alambil-ca form page, fill in the required fields, make sure to choose “server” for the Key Server type and don’t put any password in the key password field. Click Save when finished.
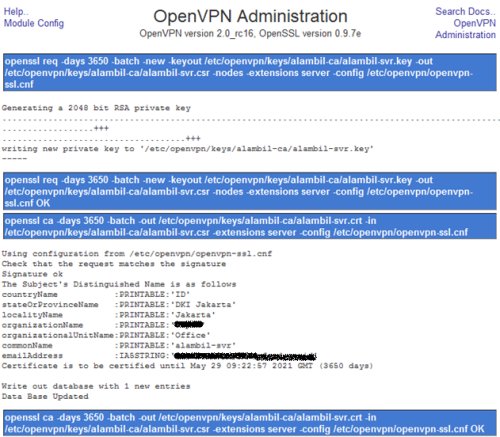
The system will generate the server key.
3. Create New VPN server and configure the server
We will use the Certification Authority to create the VPN Server. Go to Servers -> OpenVPN + CA, click on VPN List, then click on the New VPN server.

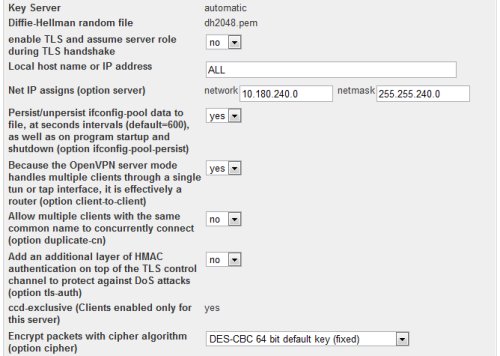
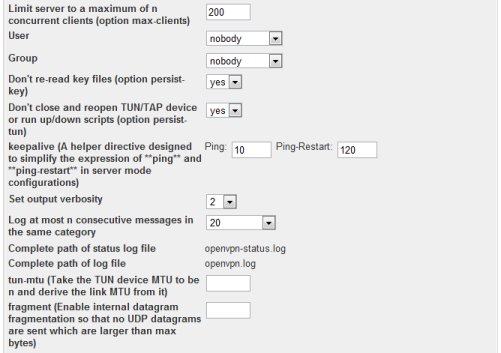
In the New VPN Server form page, fill in the required fields.
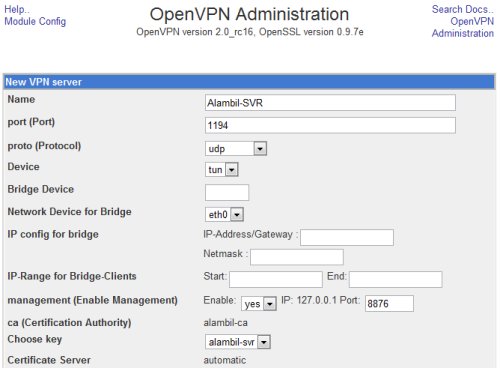

The port use in the VPN server should be allowed access in the firewall.
In the NetIP assign, allocate a network address range that will be used for the TUN interface of the VPN server and for the connecting clients. Make sure that this network range is routable in the LAN.
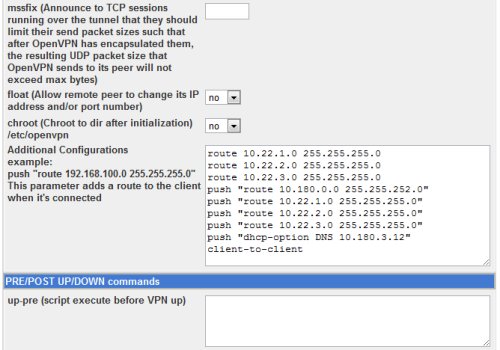
In the vpn server configuration, we put additional configuration:
route 10.22.1.0 255.255.255.0
route 10.22.2.0 255.255.255.0
route 10.22.3.0 255.255.255.0
push "route 10.180.0.0 255.255.252.0"
push "route 10.22.1.0 255.255.255.0"
push "route 10.22.2.0 255.255.255.0"
push "route 10.22.3.0 255.255.255.0"
push "dhcp-option DNS 10.180.3.12"
client-to-client
The route entries are added on the server to adjust the server local routing table, telling it to route those networks over the vpn. The push routes are added on the clients connecting, telling them to route those networks over the vpn connection. The push dhcp-option are added on the clients connecting, so that they can use the specified private DNS server. The client-to-client are added so that client can connect to other client over the vpn connection.
4. Create client Key and VPN client account for each client
We need to create client Key and VPN client account for each client that will use VPN connection. To create the client key, go to Servers -> OpenVPN + CA, click on the Certication Authority List, then click on Keys list.
In the New key to Certification Authority: alambil-ca form page, fill in the required fields, make sure to choose “client” for the Key Server type. Click Save when finished.
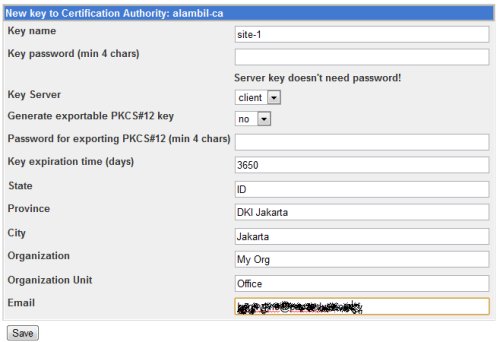
The system will generate the client key.
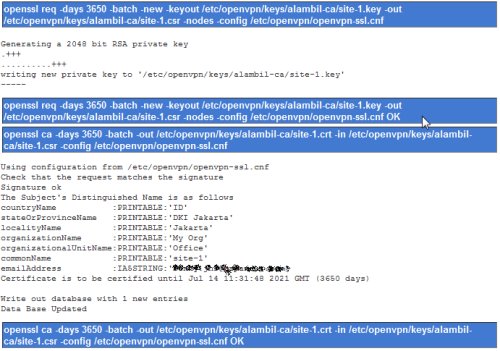
To create the OpenVPN client account for the client key, go to Server -> OpenVPN +CA, click on VPN List. In the VPN Server list page, client on Client List of the VPN Server.

Then click on New VPN Client button.
![]()
In the New VPN Client form page, fill in the required fields.
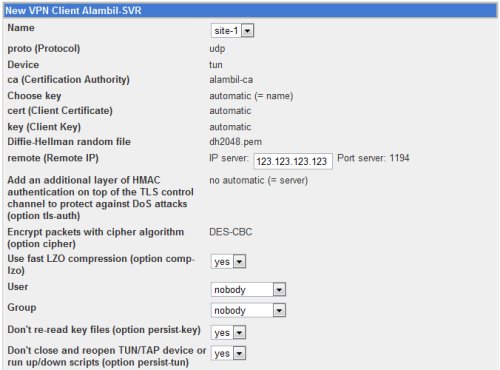
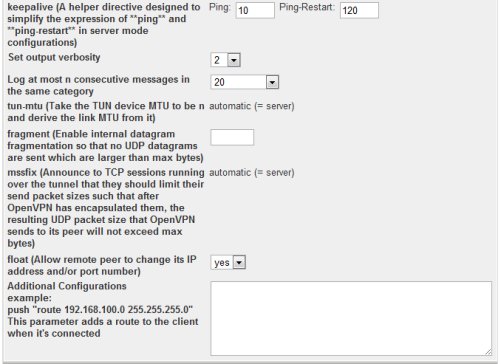
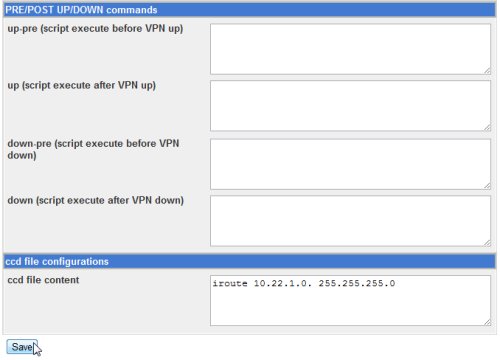
In the remote IP field, fill in with the public IP of the VPN server. Make sure that the port is opened in the firewall.
In the ccd file content field for client site-1, we put:
iroute 10.22.1.0 255.255.255.0
The iroute entry is useful for site-to-site VPN. The iroute entry tells the openvpn server that client site-1 is responsible for or the owner of the network 10.22.1.0/24. When creating VPN client for mobile user, there is no need to add the iroute entry.
5. Enable IP forwarding on the server
To enable IP forwarding on the server, in the webmin, go to Networking -> Network Configuration, then click on Routing and Gateways.
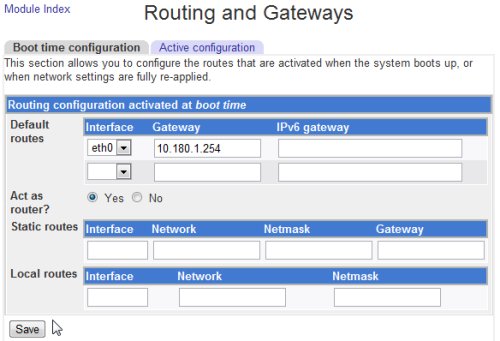
Make sure to choose Yes on the Act as router, then in the network configuration page, click Apply Configuration button.

You can also use the shell command to enable ip forwarding:
# echo 1 >> /proc/sys/net/ipv4/ip_forward
To check if the configuration have been applied correctly, use cat to display the value. It should be 1.
# cat /proc/sys/net/ipv4/ip_forward
6. Configure the firewall
In the firewall, we should configure:
– NAT policies to associate public IP and private IP used by the OpenVPN server
– Access rule from the Internet to the public IP of the OpenVPN server on port 1194
– Access rule from DMZ to LAN for VPN client to access resources on the LAN
– Access rule from LAN to DMZ for computers on the LAN that need access to the VPN client
If needed, we can also enable firewall/iptables on the Linux server. If we do it, then we need to put access rule for the VPN client to access resources outside the OpenVPN server and vice versa.
In the next section, we will discuss about the client side of OpenVPN configuration.
July 13th, 2024 at 4:15 am
canadianpharmacy cheap cialis no prescription canadian pharmacy 24h
July 13th, 2024 at 8:13 pm
onlinepharmacy cialis without prescription pharmacy rx one viagra
July 14th, 2024 at 11:49 am
on line pharmacy cialis without a doctors prescription canadian pharmacy
July 15th, 2024 at 3:13 am
canadian pharmacy no prescription cialis no prescription canadian pharmacy no prescription
July 15th, 2024 at 6:50 pm
canadian pharmacy generic cialis no prescription pacific care pharmacy
July 16th, 2024 at 10:23 am
generic cialis online pharmacy reviews cialis without prescription on line pharmacy
July 17th, 2024 at 2:11 am
4 corners pharmacy no prescription cialis 4 corners pharmacy
July 17th, 2024 at 5:41 pm
online pharmacy india order cialis without prescription canadian pharmacy online no script
July 18th, 2024 at 8:34 am
on line pharmacy cheap cialis no prescription canadian pharmacy express
July 18th, 2024 at 5:15 pm
online pharmacies
July 18th, 2024 at 11:28 pm
viagra from usa pharmacy cheap cialis no prescription 247 overnight pharmacy canadian
July 19th, 2024 at 2:28 pm
viagra from usa pharmacy cialis without prescription canadian pharmacy 24h
July 20th, 2024 at 5:35 am
online pharmacy
July 20th, 2024 at 2:15 pm
canada pharmacy 24 hour drug store canadian pharmacy cialis onlinepharmacy
July 20th, 2024 at 5:53 pm
supreme suppliers mumbai
July 21st, 2024 at 6:55 am
supremesuppliers
July 21st, 2024 at 9:52 am
canadian pharmacy
July 21st, 2024 at 7:09 pm
supreme suppliers viagra
July 22nd, 2024 at 7:30 am
supreme suppliers
July 23rd, 2024 at 8:07 am
suhagra supreme suppliers
July 24th, 2024 at 8:47 am
supreme supplies in india
July 25th, 2024 at 9:20 am
supreme suppliers mumbai 400 058 india
July 25th, 2024 at 9:11 pm
canada pharmacy online
July 26th, 2024 at 9:32 am
supreme suppliers mumbai india